How to: MGS/AWG set up for Open VPN - SSL VPN Road Warrior
Open VPN - SSL VPN Road Warrior - Table of Contents
1. OpenVPN - Setup SSL VPN Road Warrior
1.1.2 Add Certificate Authority
4.0 Step 3 - Export Client Configuration
5.0 Step 4 - Multi Factor Authentication
1. OpenVPN - Setup SSL VPN Road Warrior
Road Warriors are remote users who need secure access to the company’s infrastructure. activeARC® uses OpenVPN for its SSL VPN Road Warrior setup and offers OTP (One Time Password) integration with standard tokens and Google's Authenticator.
The main advantages of using SSL VPN for Road Warriors instead of IPsec are:
· Easy setup on almost all mobile clients using activeARC®’s Client Configuration Export.
· Fine grained access control by using multiple servers or Client Specific Overrides.
· No issues with NAT without NAT-T
With this how-to we’ll show you how to configure activeARC®’s SSL VPN for road warriors and give you configuration examples for:
· Two Factor Authentication (2FA)
· Multi Factor Authentication (Client Certificate + Password + OTP)
· Client configuration on Windows, macOS, iOS and Android
Note
For the sample we will use a private IP for our WAN connection. This requires us to disable the default block rule on wan to allow private traffic. To do so, go to Interfaces ‣ [WAN] and uncheck “Block private networks”. (Dont forget to save and apply)
For the sample configuration we configure the activeARC® gateways.
Company Network with
Remote Client
|
Hostname |
fw1 |
|
WAN IP |
172.18.0.129 |
|
LAN IP |
192.168.1.1/24 |
|
LAN DHCP Range |
192.168.1.100-192.168.1.200 |
|
SSL VPN Clients |
10.10.0.0/24 |
For our example we will use two factor authentication (2FA) and multi factor authentication. So, before we start with the SSL VPN configuration, we will need a TOTP server and a valid signing certificate authority.
For completeness of this how-to we will also prepare a user.
To configure a Time-based One-Time Password server, go to System ‣ Access ‣ Servers and click Add in the top right corner of the form.
Now first change the Type to Local + Timebased One time Password, Enter a Descriptive name such as TOTP VPN Access Server
For our example we leave everything else default as we will be using Google’s Authenticator and the defaults are correct for that.
When using other tokens you may need to change the Token length.
Click Save to add the new server.
1.1.2 Add Certificate Authority
The VPN server needs a certificate authority to sign client or server certificates.
To setup a new certificate authority, go to System ‣ Trust ‣ Authorities and click Add in the top right corner of the form.
For our example we will use the following settings:
|
Descriptive name |
SSL VPN CA |
|
Method |
Create an internal Certificate Authority |
|
Key length (bits) |
4096 |
|
Digest Algorithm |
SHA512 |
|
Lifetime (days) |
365 |
|
Country Code |
NL |
|
State or Province |
ZH |
|
City |
Middelharnis |
|
Organization |
activeARC® |
|
Email Address |
spam@activeARC®.org |
|
Common Name |
internal-sslvpn-ca |
Click Save to add the new Certificate Authority.
After creating the Authority we will also need a certificate. To create a new certificate, go to System ‣ Trust ‣ Certificates and click Add in the upper right corner of the form.
Fill in the form with (leave the rest default):
|
Method |
Create an internal Certificate |
|
Descriptive name |
SSLVPN Server Certificate |
|
Certificate authority |
SSL VPN CA |
|
Type |
Server Certificate |
|
Key length (bits) |
4096 |
|
Digest Algorithm |
SHA512 |
|
Lifetime (days) |
365 |
|
Country Code |
NL |
|
State or Province |
ZH |
|
City |
Middelharnis |
|
Organization |
activeARC® |
|
Email Address |
spam@activeARC®.org |
|
Common Name |
SSLVPN Server Certificate |
Click Save to create the certificate.
To add a new user, go to System ‣ Access ‣ Users and click Add in the top right corner.
Creating a user will be done in two steps, the first one is adding a basic user with a username, password, TOTP seed and user certificate. The second step (after saving) will be to activate the generated OTP seed with a Google Authenticator compatible app.
For the first step we enter:
|
Username |
Donald |
|
Password (2x) |
S3cr3tP@ssw0rd |
|
Full name |
Donald Duck |
|
Certificate |
Check “Click to create a user certificate” |
|
OTP seed |
Check “Generate new secret” |
Click Save and you will be redirected to create the User Certificate. Fill in the Certificate form with the following for our example (leave anything not listed on its presented defaults):
|
Method |
Create an internal Certificate |
|
Descriptive Name |
Leave default (Donald) |
|
Certificate authority |
SSL VPN CA |
|
Type |
Client Certificate |
|
Key length |
4096 |
|
Digest Algorithm |
SHA512 |
Click Save and you will be redirected to the User page. Now we will activate your newly created seed with your Google Authenticator compatible app. To do so click in the Click to unhide button in the OTP QR code row and you will get a QR code to scan with your smartphone. See also: Configure 2FA TOTP & Google Authenticator.
Adding a new SSL VPN server is relatively simple. We’ll start by adding one that uses our two factor authentication. This setup offers a good protection and it is easy to setup on the clients as each client can use the same configuration.
Go to VPN ‣ OpenVPN ‣ Servers and click Add in the top right corner of the form.
For our example will use the following settings:
|
Description |
My SSL VPN Server |
|
Server Mode |
Remote Access (User Auth) |
|
Backend for authentication |
TOTP VPN Access Server |
|
Protocol |
UDP |
|
Device Mode |
Tun |
|
Interface |
WAN |
|
Local port |
1194 |
|
TLS Authentication |
Leave both on enabled (checked) |
|
Peer Certificate Revocation List |
N/A |
|
Server Certificate |
SSLVPN Server Certificate (CA: SSL VPN CA) |
|
DH Parameters Length |
4096 bit |
|
Encryption algorithm |
AES-256-CBC (256-bit key, 128-bit block) |
|
Auth Digest Algorithm |
SHA512 (512-bit) |
|
Hardware Crypto |
No Hardware Crypto Acceleration |
|
Certificate Depth |
One (Client+Server) |
|
IPv4 Tunnel Network |
10.10.0.0/24 |
|
IPv6 Tunnel Network |
Leave Empty |
|
Redirect Gateway |
Leave Unchecked |
|
IPv4 Local Network/s |
192.168.1.0/24 |
|
IPv6 Local Network/s |
Leave Empty |
|
IPv4 Remote Network/s |
Leave Empty |
|
IPv6 Remote Network/s |
Leave Empty |
|
Concurrent connections |
Leave Empty |
|
Compression |
Enabled with Adaptive Compression |
|
Type-of-Service |
Leave Unchecked |
|
Duplicate Connections |
Leave Unchecked |
|
Disable IPv6 |
Checked |
|
Dynamic IP |
Leave Unchecked |
|
Address Pool |
Leave Checked |
|
Topology |
Leave Unchecked |
|
DNS Default Domain |
Leave Unchecked |
|
DNS Servers |
Leave Unchecked |
|
Force DNS cache update |
Leave Unchecked |
|
NTP Servers |
Leave Unchecked |
|
NetBIOS Options |
Leave Unchecked |
|
Client Management Port |
Leave Unchecked |
|
Renegotiate time |
0 |
Note
Renegotiate time is used to
renegotiate data channel key after n seconds (default=3600). When using a one-time password, be advised
that your connection will automatically drop because your password is not valid
anymore. Set to 0 to disable, remember to change your client when changed
later. Click Save to
add the new server.
To allow SSL VPN client connections, we should allow access to the OpenVPN server port on the WAN interface. When using multiple servers we need to open up each port.
For
our configuration we only use one server, accessible on UDP port 1194.
Next we also need to allow traffic from the VPN clients to our LAN interface. For our example we will allow client to access anything on our local area network, however you may decide just to allow traffic to one or more servers.
4.0 Step 3 - Export Client Configuration
For macOS & Windows users we recommend using Viscosity from Sparklabs (https://www.sparklabs.com/viscosity/).
ALERT - This is just a recommendation. ICCN has no liability on what the user decides to use, nor any endorses the above recommendation
Go to VPN ‣ OpenVPN ‣ Client Export and select the newly created VPN server from the list. Leave everything default and Download the Viscosity Bundle from the list of export options under Client Install Packages.
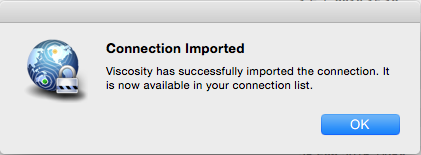
Now on your Mac or Windows PC unpack the bundle and import the Viscosity.visc file. Double clicking it should be enough to get it imported. When asked for an application to open the file with search and select Viscosity.
Some sample screenshots (macOS):
Import Configuration
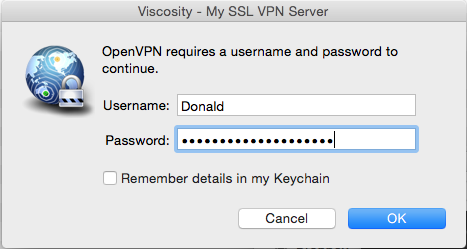
Connect & login
In the password field enter your TOTP token first followed by your password.
Connected
For Android users we recommend using OpenVPN for Android (https://play.google.com/store/apps/details?id=de.blinkt.openvpn).
ALERT - This is just a recommendation. ICCN has no liability on what the user decides to use, nor endorses the above recommendation
Go to VPN ‣ OpenVPN ‣ Client Export and select the newly created VPN server from the list. Leave everything default and Download the inline Android configuration from the list of export options under Client Install Packages.
Import the hostname-udp-1194-android-config.ovpn file into OpenVPN for Android. Clicking the file should be enough to get it imported. When asked for an application to open the file with, select OpenVPN for Android.
For iOS users we recommend using OpenVPN Connect (https://itunes.apple.com/us/app/openvpn-connect/id590379981).
ALERT - This is just a recommendation. ICCN has no liability on what the user decides to use, nor any endorses the above recommendation
Go to VPN ‣ OpenVPN ‣ Client Export and select the newly created VPN server from the list. Leave everything default and Download the inline OpenVPN Connect configuration from the list of export options under Client Install Packages.
Import the hostname-udp-1194-ios-config.ovpn file into OpenVPN Connect. Clicking the file should be enough to get it imported. When asked for an application to open the file with, select OpenVPN Connect.
5.0 Step 4 - Multi Factor Authentication
For two factor authentication you need the factors username/password and a token. activeARC® supports another layer, namely a user certificate. This means that every user will be uniquely identified by the user certificate. In this case the multi factors are:
· User certificate
· Username/Password
· Token (TOTP)
Go to VPN ‣ OpenVPN ‣ Servers and click the pencil icon next to the server we just created to change the 2FA to multi factor authentication.
Now change Server Mode to Remote Access (SSL/TLS + User Auth) and leave everything else unchanged. Click Save on the bottom of the form.
Now when you go to the client exporter, you will see that each user is listed separately. In our case we see Donald listed. Exporting and importing this configuration works exactly the same as before, the only difference is that each user requires a User certificate and therefore their own configuration.
Related Articles
How to: MGS/AWG SSL VPN - Site-to-Site Tunnel
Contents 1.0 Setup SSL VPN site-to-site tunnel 2 Before you start 2 Sample Setup. 2 Site A - Server 3 Site B - Client 3 Full Network Diagram Including SSL VPN Tunnel 4 2.0 Step 1 - Add SSL Server. 5 3.0 Step 2 - Copy Shared Key. 6 4.0 Step 3 - Server ...Quick Start Guide - MGS/AWG Gateway/Firewall
Intended audience This guide is designed to be used by network managers, IT administrators, and technicians who are responsible for installing, networking equipment in enterprise and service provider environments. Knowledge of telecommunication and ...How to: Setting up Monit natively on the MGS/AWG Gateway
MGS/AWG - Monit Package Monit plugin is a Unix system management and proactive monitoring tool. This document will help guide set up the Monit tool on the ICCN AWG gateway. This Monit package is included in the AWG system by default. Monit is a ...How to: MGS/AWG - Inline Intrusion Prevention System
Contents 1.0 Inline Intrusion Prevention System... 1 1.1 General setup. 2 1.2 Advanced options. 3 1.3 Finger Printing. 4 2.0 Rulesets. 4 2.1 Emerging Threats ETOpen Ruleset 4 2.2 Abuse.ch. 4 2.3 SSL Blacklist 5 2.4 Feodo Tracker 5 2.5 URLHaus List 5 ...How to: MGS/AWG - Setting up a Routed IPSec Tunnel
Contents 1.0 Setup a routed IPSec Tunnel 3 1.1 Before you start 3 1.2 Sample Setup. 3 1.3 Firewall Rules Site A & Site B (part 1) 6 2.0 Step 1 - Phase 1 Site A. 6 2.1 General information. 6 2.2 Phase 1 proposal (Authentication) 6 2.3 Phase 1 proposal ...